Google Tag Manager (GTM) allows you to track user interactions on your website that aren’t collected by software such as Google Analytics by default. You can configure what is tracked without touching a line of code. In this article we will show you how to track custom user interactions on your website, and then send that data to Google Analytics for later viewing.
Google Tag Manager allows you to do some cool things such as:
- Track how many times files are downloaded and which are the most popular.
- Track link clicks and which particular links are clicked.
- Track user form submissions.
Terminology
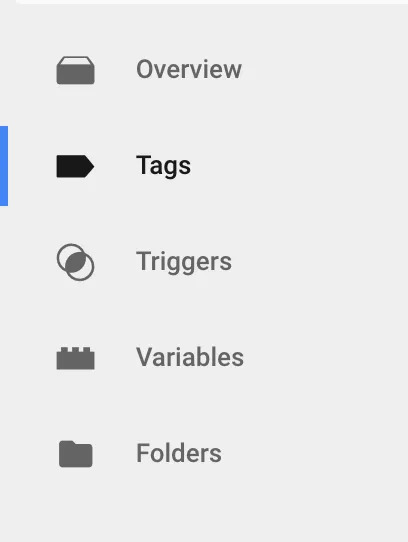
Google Tag Manager’s terminology can seem a bit alien at first; you have got Tags, Triggers and Variables. Quite abstract concepts but not to worry. Okay maybe just a little.
Tag
A Tag represents the thing you want to track. For example you might like to count how many times users login to your site. You would create a Tag called “Track User Logins”. A Tag is just the container for the event we want to track. It’s a form that you fill out and in the process add Triggers and Variables.
Trigger
If a Tag is the container for your event, then the Trigger is the event. This is where you’ll spend most of your time! Triggers can be used to capture many types of events. While Google Analytics tracks page views, Google Tag Manager tracks the many other interactions on a page. Common events include:
- A form is submitted
- A link is clicked
- A checkbox is selected
In this article we’ll be tracking a form submission as it’s a good way to demonstrate the flexibility of GTM.
Variables
Variables pertain to a particular event. For example when a link is clicked its URL is made available as a variable called Click URL. Custom variables can be created through Javascript but the default variables created by Google Tag Manager are more than enough for most needs:
- Page URL - The full URL with “http://”, the domain name and all.
- Page Path - Just the path after the domain name. It’s prefixed with a slash “/about-us”
- Form ID - The ID of the form that’s being submitted
- Form Classes
- Click URL - The full URL (with “http://”) of the link that was clicked or the file that was downloaded.
- Click Path - Just the path after the domain name.
- Click Text - The text on the link itself (between the opening <a> tag and the closing </a> tag).
If you can’t see a variable in the UI then make sure it is enabled on the Variables page.
Let’s Track Something
If you haven’t already, head on over to GTM and setup an account.
Create a Tag
Let’s track a form submission on a user login form. In GTM go to “Tags -> New”.
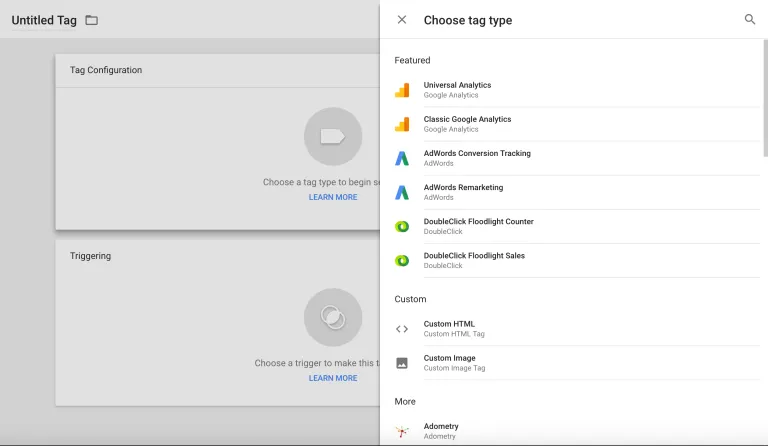
Choose Tag Type
Click on Tag Configration and select “Google Analytics/Universal Analytics”.
Tag Configuration
Enter the “Tracking ID” of your Google Analytics account and set the “Track Type” to “Event”.
A few new fields will appear. Google Analytics will use these fields to identify the event when it shows up in the reporting interface. Set “Category” to “User” and the “Action” to “Login”. The “Value” field is very nifty. Placing a variable here such as {{click_path}} will identify your event and provide deeper analytics.
Triggering
It’s here that we create the Trigger. The trigger details the event that we want to listen for to trigger this Tag. You can also create Triggers separately through the GTM UI via the Triggers section and reference them here. It’s just as valid to create everything in the one workflow.
Create a Trigger
Click on the Triggering window and then on the "Choose a trigger" screen click the plus icon at the top right.
In "Trigger Configuration" choose a trigger type of "Form Submission".
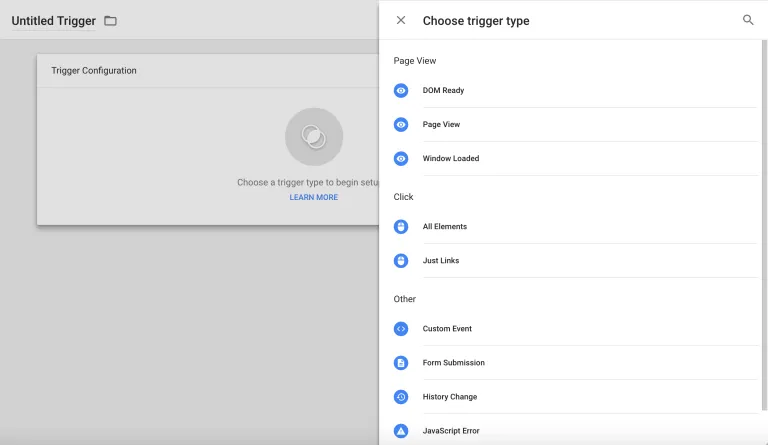
Name your trigger “Track User login”.
Configure Trigger
Wait For Tags and Check Validation are two handy configuration options when working with forms. Understanding how they work can help eliminate a lot of painful debugging moments down the track, trust me.
Check Validation
Say we’re tracking how many times users login. Without Check Validation enabled then GTM will track every login attempt, even if it was unsuccessful (incorrect password etc.) Enable Check Validation and the login will only be tracked when the user successfully logs in to the site.
Wait For Tags
If your tag is on a form submission event, there is a strong chance that the form submission will lead to a new page load before your Tag has a proper chance to fire and send that information back to Google Analytics. Selecting Wait For Tags will prevent this from happening.
When you select either Wait For Tags or Check Validation, GTM will force you to then filter which pages or page elements this event is listened on. Google recommends enabling Tags only on pages that need it. Sometimes it can be difficult to target a Tag by URL and it’s just easier to have it run on every page. There is a way to get out of this undesired filter. Set your ‘Page Path’ to ‘Matches RegEx’ and input the following value:
.*
Your Tag will now run on every page. If you can target your Tag to a particular Page Path then that’s recommended.
Debugging
GTM has debugging baked in. You create and customise your tags on the live site using Preview mode. Preview mode allows you to work on a new revision of the Tags, Triggers and Variables in just your browser, while everyone else see the previously published version.
Testing Tags
A great sore point is finding out whether your Tag has fired or not. Sometimes a Tag won't fire for any seemingly good reason.
Click the Preview button in Google Tag Manager and then visit your page. A debugging window will appear at the bottom of your browser window. Tags will show up here:
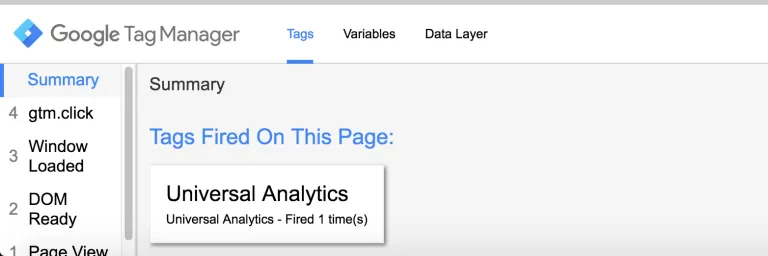
When a Tag is triggered it will pop up under the “Tags Fired On This Page” heading. Be quick to catch it as your event may result in a new page load such as a form submission, leaving you little time to see if your Tag was fired.
If your Tag is not firing it can be difficult to know why. If your filtering by pages check that your RegEx is correctly setup. If you’re filtering by Page Path or Page URL ensure you have used ‘contains’ or ‘equals’ correctly.
Failing that the next best thing to do is to drill down into the Tag in preview mode. Under “Tags Not Fired On This Page” click on your Tag. Scroll down to “Firing Triggers” and check that your conditions make sense.
Bringing it into Google Analytics
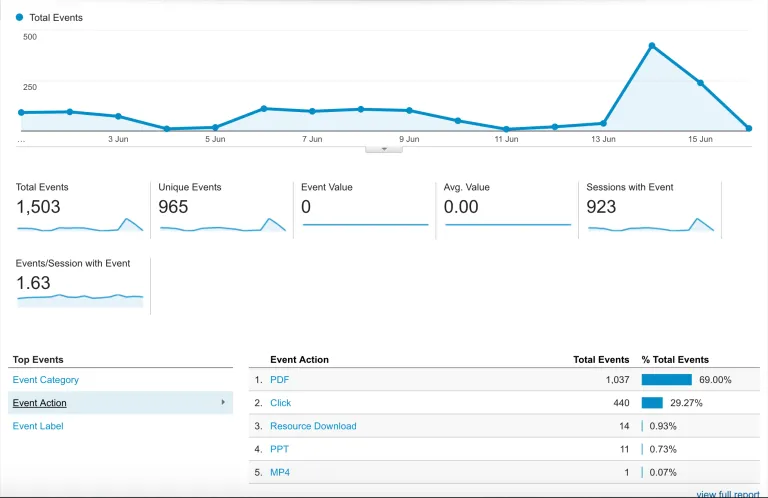
If everything is configured correctly then you should see events coming into Google Analytics almost immediately under “Real Time” -> “Events”. A few hours later the event will also show in “Behaviour” -> “Events”.
Debugging Google Analytics
Sometimes your Tag may be firing but not showing up in the Real Time -> Events section of Google Analytics.
While working on a site I experienced a situation where my Tag was firing in Preview mode but not showing up in Google Analytics at all. A similar Tag that was based on a form submission event was firing and showing up in Google Analytics. Why? It was my AdBlocker :) If you have any issues check that your browser extensions aren’t blocking anything.
Google Tag Assistant is a Chrome extension and similar to the Preview mode of GTM. It lists which Tags are on the page and lets you record events through page refreshes. It can be a handy tool as it works even when GTM is not in debug mode.
Note
This article assumes that you have Google Analytics embedded separately using its default script tag. If you’re happy with Google Tag Manager then you might like to include Google Analytics via a GTM Tag.
Summary
Well that was a lot to go through. I hope you made it to the end with your wit intact.
In this article we’ve used Google Tag Manager to track custom events and log them into Google Analytics. All it takes is a Tag and a Trigger and a little bit of configuration. Similar steps can be used to track various interactions such as link clicks and form events.
GTM gives you insight into your website over and above metrics collected from traditional analytics. You are no longer limited to tracking page views and can now drill down into user interactions within a page, giving you deeper insights.
The Tag in this article was based off a real world requirement for a client, where we gathered metrics on multiple user interactions. Any website would benefit from these increased analytics.


